

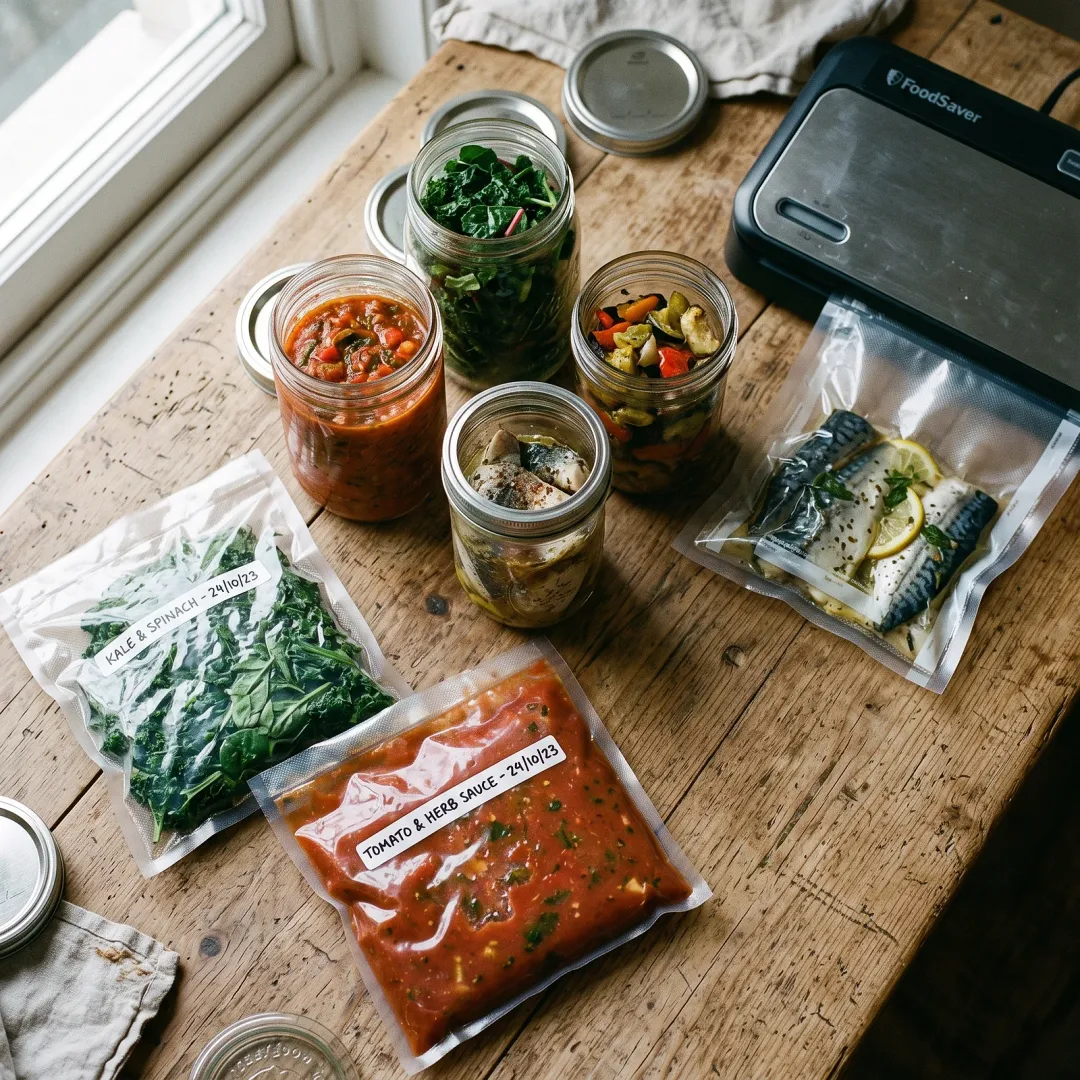

Freezer burn is not a mystery. It's physics, and once you understand what's happening inside that bag of frozen mackerel, you'll never lose a batch-cook to icy, gray, dried-out food again.
What Freezer Burn Actually Is (And Why That Matters)
Most people think freezer burn is about temperature, that the freezer got too cold or something went wrong with the appliance. Nope. Freezer burn is sublimation. Water molecules escape from the surface of your food directly into the air inside the freezer without passing through a liquid phase first. The result is dehydrated, oxidized patches on whatever you worked so hard to cook and freeze. The USDA's Food Safety and Inspection Service confirms that freezer-burned food is safe to eat but the texture and flavor are compromised, sometimes badly. That gorgeous sardine fillet or whole mackerel you bought on sale? It turns gray, leathery, and tastes like cardboard. All of that is preventable.
The other half of the equation is air. Oxygen exposure causes oxidation of fats, which is a separate process from sublimation but happens alongside it. Oily fish like mackerel, sardines, and anchovies are particularly vulnerable because they're high in the polyunsaturated fats that go rancid fastest when exposed to air. So with these proteins especially, eliminating air contact is non-negotiable, not just helpful.
This article is for general informational purposes only and is not medical advice. Always consult a qualified healthcare professional before making changes to your diet or health routine.
Step 1: Cool Food Completely Before It Touches the Freezer
This sounds obvious, but I still see people sliding a hot pot of fish stew straight into the freezer. When you put warm food in, it raises the temperature inside, which causes partial thawing of nearby items and then refreezing, which hammers texture and creates ice crystals that speed up freezer burn in everything around it.
Cool cooked food to room temperature first, ideally within two hours per food safety guidelines. For large pots, an ice bath works fast. Set the pot in a bigger bowl or sink filled with ice and cold water, stir occasionally, and it cools in 20 to 30 minutes. Then it's ready to portion and freeze.
Step 2: Portion Before You Freeze, Not After
One of the best things you can do for your future self is to freeze in the exact amounts you'll actually use. If you're making a big batch of mackerel in tomato sauce, freeze it in two-serving portions instead of one giant block. Why? Every time you thaw and refreeze (or dig around in a giant bag hunting for enough for dinner), you're introducing more air and temperature fluctuation, both of which accelerate freezer burn.
For proteins like whole sardines or mackerel fillets, lay them flat on a parchment-lined baking sheet and freeze for an hour or two until firm. This is called flash freezing or IQF (individually quick frozen), the same method commercial processors use. Once solid, you can transfer them to a bag or container and they won't clump together, so you can grab exactly what you need. The FDA's guidance on home freezing emphasizes that freezing food quickly and at consistent temperatures protects both safety and quality.
Step 3: Choose the Right Container (This Is Where Most People Lose)
The container you freeze in matters more than almost anything else. Here's how to read your options:
Zip-top freezer bags (not sandwich bags): Freezer bags are thicker and have a lower vapor transmission rate, meaning moisture escapes more slowly. Sandwich bags are too thin. When you use freezer bags, press out as much air as possible before sealing. You can use a straw to suck out remaining air, or do the water-displacement method: seal the bag most of the way, submerge it in a bowl of water until the water pressure pushes air out, then seal the last inch. This is budget-friendly and genuinely effective.
Vacuum sealing: This is the gold standard. A vacuum sealer removes nearly all the air from a bag before sealing it, which dramatically slows both sublimation and oxidation. According to research summarized by the National Center for Home Food Preservation, proper packaging that minimizes air contact is the primary defense against quality loss during frozen storage. For oily fish like mackerel or sardines, vacuum sealing can extend quality from one or two months up to six to nine months without significant flavor or texture loss.
Glass containers: I love glass for reheating and I know a lot of you do too. Glass is fine for the freezer if you leave an inch or more of headspace at the top for expansion, and if you use straight-sided jars rather than curved ones (which are more likely to crack). Wide-mouth mason jars are my go-to for soups and sauces. The key is still getting the lid on as tight as possible to minimize air in that headspace.
Plastic containers: If you use plastic, make sure it's labeled freezer-safe. Thin deli containers crack and let air in. Press a layer of plastic wrap directly onto the surface of the food before putting the lid on. That direct contact layer makes a real difference.
Step 4: Label Accurately and Freeze at the Right Temperature
Your freezer should be at 0 degrees Fahrenheit or below. The USDA recommends 0°F (-18°C) as the target, and fluctuations above that, especially common in freezers that are frequently opened or overstuffed, shorten quality life noticeably. An appliance thermometer is a five-dollar investment that removes all the guessing.
Label every single thing with the date and what it is. Not because you'll forget what it looks like (you might), but because you need to rotate properly. First in, first out. The older stuff gets used first. A piece of masking tape and a Sharpie works perfectly. Fancy labels are optional. Knowing what you made three months ago is not.
General quality guidelines from the USDA for the freezer:
- Raw oily fish like mackerel or sardines: 2 to 3 months (up to 6 to 9 months vacuum-sealed)
- Cooked fish dishes: 4 to 6 months
- Cooked meat and poultry: 2 to 6 months depending on cut
- Soups and stews: 2 to 3 months
- Blanched vegetables: 8 to 12 months
- Cooked vegetables: 1 to 2 months
These are quality guidelines, not safety cutoffs. Frozen food at a consistent 0°F stays safe indefinitely. The question is whether it's still good.
Step 5: Blanch Vegetables Before Freezing
Raw vegetables frozen without any prep almost always end up mushy and dull because enzymes that are naturally present continue to work even at freezing temperatures, breaking down color, flavor, and texture. Blanching (dropping them briefly in boiling water and then immediately into ice water) deactivates those enzymes.
The National Center for Home Food Preservation has a full blanching time guide by vegetable. Leafy greens like kale and spinach need about two minutes. Broccoli and cauliflower florets need three. Green beans get three to four minutes. After the ice bath, dry them as thoroughly as you can before bagging. Excess moisture is just future ice crystals. A salad spinner is fantastic for this.
Step 6: Read the Freezer Burn Signs Before You Cook
Even when you do everything right, sometimes life happens: the freezer door was left cracked, the power blipped, a bag wasn't sealed quite tight enough. So here's how to decode what you're looking at when you pull something out:
White or grayish patches on meat or fish: Classic freezer burn. Cut it off. The rest is fine to cook.
Large ice crystals inside the bag: The food thawed and refroze at some point. The texture may be compromised, especially for fish. Taste before committing it to a whole recipe.
Off smell after thawing: For oily fish especially, a truly rancid smell means the fats oxidized significantly. This is not a safety issue from freezer burn specifically, but rancid fat is worth knowing about. If mackerel smells strongly fishy in a sharp, sour way rather than just fresh-fishy, it's past its prime. Trust your nose.
Dull, washed-out color in vegetables: Enzyme activity or sublimation. Still safe, texture may be soft. Better in cooked dishes than eaten alone.
The Bigger Picture: A Full Freezer Is a Healthier Freezer
There's a practical reason to keep your freezer close to full: thermal mass. A full freezer maintains its temperature more consistently than an empty one because all that frozen food acts as a buffer when the door is opened. The USDA notes that a full freezer will hold its safe temperature for about 48 hours in a power outage, versus 24 hours for a half-full one. Fill gaps with bags of ice or frozen water bottles if your freezer is running light.
For me, the freezer is one of the most important tools in eating this way without burning myself out. I don't have hours every Sunday to cook from scratch. Having a stash of mackerel in tomato sauce, blanched greens, and homemade bone broth ready to go is what makes real food sustainable for a real life. God gave us food preservation for a reason, and I am not going to waste a batch of good fish to a poorly sealed bag.
Get the method right once and it becomes automatic. That's how batch cooking actually sticks.
Key Takeaways
- Freezer burn is caused by sublimation (moisture escaping from food) and oxidation, not by the freezer being too cold.
- Oily fish like mackerel and sardines are especially vulnerable to freezer burn because of their high polyunsaturated fat content.
- Flash freeze proteins individually before bagging so you can grab exactly what you need without clumping.
- Vacuum sealing removes the most air and is the best method for long-term quality, especially for oily fish.
- Blanch vegetables before freezing to deactivate the enzymes that destroy texture and color.
- Keep your freezer at 0 degrees F, label everything with a date, and rotate older items to the front.
- A full freezer holds temperature more consistently than an empty one.
Frequently Asked Questions
How long can I freeze oily fish like mackerel before freezer burn sets in?
Raw oily fish like mackerel or sardines stored in a standard zip-top freezer bag will hold their quality for about 2 to 3 months at 0°F. Vacuum-sealed, that extends to roughly 6 to 9 months before noticeable texture and flavor loss. The USDA notes these are quality guidelines, not safety cutoffs. Frozen food held at a consistent 0°F stays safe indefinitely, but quality degrades over time.
Is it safe to eat food that has freezer burn?
Yes. The USDA confirms that freezer-burned food is safe to eat. The burn affects texture and flavor, not safety. For minor freezer burn on meat or fish, cut off the affected patches and cook the rest normally. If the off-flavor is throughout the food, it may not be pleasant to eat, but it won't make you sick.
Do I really need a vacuum sealer or can I prevent freezer burn without one?
You can prevent freezer burn without a vacuum sealer. The key is removing as much air as possible from bags before sealing. The water-displacement method works well: fill a zip-top freezer bag with your food, seal it almost completely, then submerge it in a bowl of water. The water pressure pushes air out through the small unsealed gap. Seal that last inch once the air is out. It's not quite as thorough as vacuum sealing, but it's a solid method with no equipment cost.
Why do vegetables get mushy when frozen without blanching?
Vegetables contain naturally occurring enzymes that continue to work even at freezing temperatures, breaking down cell walls, color, and flavor over time. Blanching (briefly boiling and then ice-bathing the vegetables) deactivates those enzymes. The National Center for Home Food Preservation recommends blanching virtually all vegetables before freezing for this reason. Without it, most vegetables turn soft and dull within a few weeks in the freezer.
Sources
- USDA Food Safety and Inspection Service: Freezing and Food Safety
- USDA Food Safety and Inspection Service: The Danger Zone: 40°F - 140°F
- U.S. Food and Drug Administration: Are You Storing Food Safely?
- National Center for Home Food Preservation: Packaging and Containers for Freezing
- National Center for Home Food Preservation: Blanching Vegetables for Freezing
This article is for general informational purposes only and is not medical advice. Always consult a qualified healthcare professional before making changes to your diet or health routine.


Join the conversation
What do you think?
Free members can comment, reply and like. It takes ten seconds.