

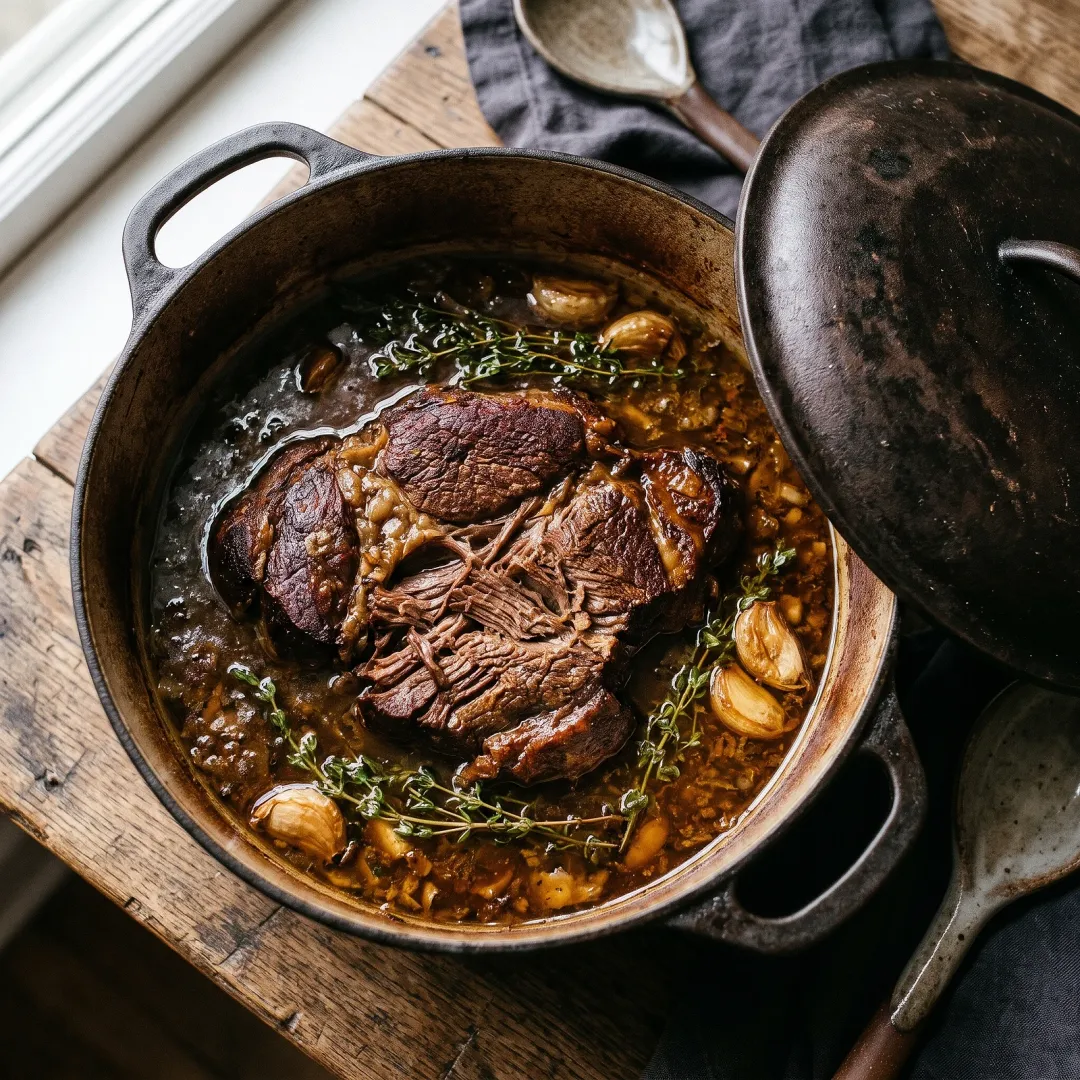

Chuck roast at $4 a pound. Beef short ribs that cost a fraction of a ribeye. Pork shoulder that feeds a crowd without wrecking the grocery budget. These are some of the most nutrient-dense, collagen-rich cuts you can buy, and most people either skip them entirely or cook them wrong and end up with something chewy and sad. Braising fixes that. It is one of the oldest cooking techniques on the planet, and when you get it right, those tough, cheap cuts become the most satisfying thing on your table.
Why Tough Cuts Are Worth Your Time
Tough cuts come from the hardest-working muscles on an animal: the shoulder, the shank, the short ribs, the chuck. Because those muscles move constantly, they develop more connective tissue, specifically a protein called collagen. That collagen is exactly what makes them challenging when you cook them fast and exactly what makes them extraordinary when you cook them slow.
When collagen is exposed to sustained, moist heat over time, it converts to gelatin. According to USDA food science resources, low-and-slow moist-heat cooking breaks down tough connective tissue and transforms the texture of the meat from stringy and resistant to silky and tender. That gelatin also dissolves into your braising liquid and turns it into something rich and glossy, nothing like the watery drippings you get from rushing the process.
From a real-food standpoint, these cuts are also more affordable and often more flavorful than their tender counterparts. Braising is not a compromise. It is the right technique for the right cut.
Before We Start: What Braising Actually Is
Braising is a two-stage cooking method: you sear the meat first over high heat to build color and flavor, then you cook it low and slow, partially submerged in liquid, in a covered pot. It is different from stewing (where the meat is fully submerged) and different from roasting (which is dry heat). The combination of steam, liquid, and trapped heat creates an environment where collagen breaks down without the meat drying out.
The science behind it is straightforward. Research on meat cooking chemistry shows that collagen-to-gelatin conversion begins around 160°F and accelerates with time, which is why a braise needs several hours at a relatively low temperature, not a quick blast of heat. High heat tightens muscle fibers and squeezes out moisture before the collagen ever has a chance to soften.
Instead of Grabbing Any Cut, Do This: Choose for Collagen
INSTEAD OF: Reaching for a lean cut like top round or sirloin tip because it is what is on sale.
DO THIS: Choose cuts with significant connective tissue. The best candidates for braising are:
- Beef chuck roast or chuck short ribs (the workhorse of braising, high collagen, deeply marbled)
- Pork shoulder or pork butt (not actually the butt, it is the upper shoulder, incredibly forgiving)
- Lamb shanks or lamb shoulder (classic braise cuts, rich and earthy)
- Beef brisket (flat or point, both braise beautifully)
- Oxtail (technically a variety cut, and one of the most gelatinous, flavorful things you will ever make)
- White fish fillets like cod or halibut (yes, fish can be braised for a shorter time, 10 to 15 minutes in a seasoned liquid, for a completely different but equally satisfying result)
The rule of thumb: the more that muscle worked during the animal's life, the more it benefits from slow, moist heat. Lean, tender cuts like tenderloin are not built for this. They will dry out. Save those for high-heat, quick methods.
Instead of Skipping the Sear, Do This: Build Your Fond First
INSTEAD OF: Dropping raw meat straight into the pot with your liquid to save time.
DO THIS: Pat the meat completely dry and sear it first in a hot, heavy-bottomed pot (a Dutch oven is ideal) with a high-smoke-point fat like avocado oil, tallow, or lard. Get a deep, dark brown crust on all sides before the liquid ever touches it.
This step is not optional if you want flavor. The Maillard reaction, the chemical process that creates browning, produces hundreds of flavor compounds that you simply cannot get any other way. Food scientists at the American Chemical Society have identified the Maillard reaction as one of the most important flavor-development processes in all of cooking. Those browned bits stuck to the bottom of your pot (the fond) are pure flavor. You deglaze them into your braising liquid and suddenly you have depth that no amount of seasoning can replicate.
Practical notes:
- Dry the meat with paper towels before searing. Moisture creates steam, steam prevents browning.
- Do not crowd the pot. Brown in batches if needed.
- The fat you use matters. Seed-oil-based sprays and low-smoke-point fats will smoke out your kitchen and add off-flavors.
Instead of Using Water or Store-Bought Broth, Do This: Build a Layered Liquid
INSTEAD OF: Filling the pot with water (or a carton of low-sodium broth and calling it done).
DO THIS: Build your braising liquid in layers so it does two jobs: braise the meat and become a sauce you want to eat on its own.
A solid braising liquid includes:
- Aromatics cooked in the same pot: onion, carrot, celery, garlic, cooked in a little fat after you remove the seared meat. Let them soften and pick up color.
- Tomato paste: a tablespoon or two, stirred into the aromatics and cooked for a minute or two until it darkens slightly. This concentrates flavor and adds body.
- A deglazing liquid: dry red wine for beef and lamb, dry white wine or apple cider for pork and poultry, bone broth for a wine-free version. Pour it in while the pot is hot and scrape up every bit of fond from the bottom.
- Quality bone broth or stock: enough to come one-third to halfway up the side of the meat, not over it. Serious Eats' food lab testing consistently shows that partially submerged braising produces better texture than full submersion because the meat above the liquid line benefits from steam, not just direct liquid contact.
- Herbs and spices: bay leaves, thyme, rosemary, a smashed garlic clove or two, whole peppercorns. These are low-effort, high-return.
The liquid should taste good before the meat goes back in. If it tastes flat, the finished dish will too.
Instead of Cooking Hot and Fast, Do This: Go Low, Go Slow, Stay Covered
INSTEAD OF: Cranking the oven to 375°F because you are hungry and want it done.
DO THIS: Set the oven between 275°F and 325°F, put the lid on tight, and walk away.
The temperature window matters. Too high and the muscle fibers seize and the liquid reduces too fast, leaving you with dry, stringy meat. Too low and the collagen conversion stalls. The sweet spot for most braised cuts is 275°F to 300°F for a longer braise (3 to 4 hours for a 3-pound chuck roast, 5 to 6 hours for a whole brisket) or closer to 325°F for something smaller like lamb shanks or short ribs that might be done in 2.5 to 3 hours.
The lid traps steam and keeps the temperature inside the pot stable and moist. Every time you lift it, you lose steam, drop the temperature, and add time. Unless a recipe specifically calls for an uncovered finish, leave it alone.
How do you know it is done? Not by time alone. The meat should offer almost no resistance when you push a fork or skewer into the thickest part. It should pull apart with very little effort. If it is still springy, it needs more time. There is no shortcut here. The collagen is either converted or it is not.
Instead of Serving It Straight From the Pot, Do This: Rest, Defat, and Reduce
INSTEAD OF: Lifting the meat out and ladling the liquid directly over it the moment it comes out of the oven.
DO THIS: Give it a proper finish.
Rest the meat first. Let it sit in the braising liquid off the heat, loosely covered, for at least 20 to 30 minutes. This lets the muscle fibers relax and reabsorb some of the juices. Cutting or shredding immediately after cooking means those juices run straight onto the cutting board.
Defat the braising liquid. Skim the fat off the surface (a fat separator pitcher makes this easy) or, even better, braise the day before, refrigerate overnight, and lift the solidified fat cap off in the morning. What remains is pure, rich braising liquid. This step is worth it.
Reduce the liquid into a sauce. Remove the meat, strain out the solids, and simmer the liquid in the pot over medium heat until it thickens to a consistency you like. A tablespoon of arrowroot starch dissolved in cold water can help it along if needed. Pour it back over the meat. This is the difference between a great braise and a transcendent one.
A little fresh herb (parsley, thyme, a squeeze of lemon) added right at the end brightens everything up and cuts through the richness.
Quick-Reference Swap Chart
Here is the whole framework in one place:
| Instead of this | Do this | |---|---| | Lean, tender cut | Collagen-rich cut: chuck, shoulder, shank, short ribs | | Skipping the sear | Pat dry, sear in batches until deeply browned | | Water or plain broth | Layered liquid: aromatics, tomato paste, wine or cider, bone broth | | High heat, fast cook | 275°F to 325°F oven, tight lid, 2.5 to 6 hours depending on cut | | Serving straight from the pot | Rest, defat, reduce the braising liquid into a sauce |
This is not complicated cooking. It is patient cooking. And there is a real difference.
A Note on Why This Kind of Cooking Matters
Braising used to be normal. Before boneless, skinless chicken breasts became the default American protein, people cooked the whole animal. They used the tough parts, the bony parts, the parts that needed time and care. It was economical and deeply nourishing, and nothing was wasted.
Real-food cooking on a budget is not about finding cheaper versions of processed convenience food. It is about learning techniques that make the humble cuts extraordinary. A $5-a-pound chuck roast braised for four hours with some aromatics and bone broth will give you more flavor and more collagen than a $30 prime rib you threw on the grill. That feels like the way food was designed to work.
Steward what you have. Use the whole animal. Take the time. The results are worth it.
This article is for general informational purposes only and is not medical advice. Always consult a qualified healthcare professional before making changes to your diet or health routine.
Key Takeaways
- Choose cuts high in connective tissue (chuck, shoulder, shank, short ribs) because the collagen converts to gelatin during a slow braise, creating fork-tender texture and a rich, silky sauce.
- Always sear the meat first in a hot pan until deeply browned. The Maillard reaction creates flavor compounds you cannot get any other way.
- Build a layered braising liquid with aromatics, tomato paste, a deglazing liquid like wine or cider, and bone broth. The liquid should taste good before the meat goes in.
- Cook low and slow at 275°F to 325°F with a tight lid. Do not rush it and do not lift the lid. The meat is done when it offers almost no resistance to a fork, not when a timer goes off.
- Rest the meat in the liquid before shredding, defat the braising liquid, then reduce it into a sauce. This finish is what separates a good braise from a great one.
Frequently Asked Questions
What is the best cut of meat for braising?
The best cuts for braising are those with significant connective tissue and marbling: beef chuck roast, beef short ribs, pork shoulder, lamb shanks, brisket, and oxtail. These cuts come from hard-working muscles that are rich in collagen. When cooked low and slow in moist heat, that collagen converts to gelatin and produces a tender, fall-apart texture and a rich, silky braising liquid.
What temperature and how long should you braise meat?
Most braised cuts do best at 275°F to 325°F in a covered Dutch oven. Timing depends on the cut: a 3-pound beef chuck roast typically needs 3 to 4 hours, short ribs and lamb shanks around 2.5 to 3 hours, and a whole brisket can take 5 to 6 hours. The real indicator is texture, not time. The meat should offer almost no resistance when you test it with a fork or skewer. If it still springs back, it needs more time.
Do you have to sear meat before braising?
Technically no, but practically yes if you care about flavor. Searing creates the Maillard reaction, which develops hundreds of flavor compounds and leaves browned bits (fond) on the bottom of the pot. Those bits get deglazed into the braising liquid and give the whole dish a depth of flavor that a raw-to-liquid braise simply cannot match. Pat the meat completely dry before searing so you get browning instead of steaming.
Can you braise in a slow cooker instead of the oven?
Yes, with some adjustments. The oven is preferred because the heat surrounds the pot evenly and the temperature is more consistent, but a slow cooker can work. Always sear the meat first in a separate pan before transferring it to the slow cooker (the slow cooker cannot get hot enough to develop a proper sear). Use the low setting for 8 to 10 hours. The braising liquid will not reduce on its own in a slow cooker, so plan to strain it and reduce it in a saucepan on the stove before serving.
Sources
- USDA Food Safety and Inspection Service: Slow Cookers and Food Safety
- Meat Science (ScienceDirect): Collagen and meat quality: Effect of cooking on collagen conversion
- American Chemical Society: The Maillard Reaction Turns 175 Years Old
- Serious Eats: The Best Braised Short Ribs
This article is for general informational purposes only and is not medical advice. Always consult a qualified healthcare professional before making changes to your diet or health routine.

Join the conversation
What do you think?
Free members can comment, reply and like. It takes ten seconds.